What it’s for
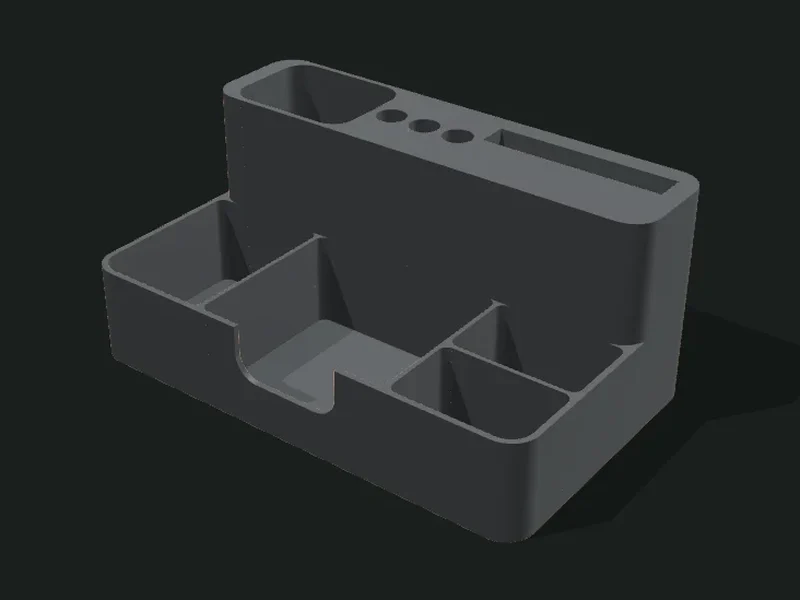
A one-piece desk station with two zones. At the back there’s a tall block with a cup, holes for pencils and a slanted slot for the phone (or, if you prefer, tall compartments). At the front there’s a low tray with custom compartments and notches to easily grab a pad of sticky notes.
Ideas
- Workstation: phone in view, pencils, clips and sticky notes in a single object.
- Nightstand organizer: phone charging (with cable pass-through), glasses and watch.
- Shop counter with cards, a pen and the phone for payments.
- Base for a kid’s desk with colored pencils and erasers.
Step by step
- Choose a preset. «Complete station» has everything; «Back capsule» uses compartments at the back.
- In «Base» set width, depth and the height of the front zone (the tray).
- In «Back block» choose what it has: cup, pencils and phone, or compartments. Adjust the height and depth.
- If you use the phone slot, measure the phone’s thickness with its case and the length you want it to rest on.
- In «Front zone» set up the columns, rows per column and which columns get the notch for the note pad.
- Look at the result in the viewer from several angles and export.
Tips
- The phone thickness must include the case and 1–2 mm of play; otherwise it won’t go in.
- The cable pass-through lets the charger cable through the back: leave it on if you’ll charge it there.
- If the cup, the pencils and the slot don’t fit in the width, the app warns you: lower the number of pencils or the cup width.
- Notches are numbered by column, from left to right; a notch on a column that doesn’t exist is ignored with a warning.
Presets
Parameters
Baseplate
Total size of the part, height of the front tray and thicknesses.
Total width of the station, from left to right. It must be enough for the cup, the pencils and the phone slot.
Total depth, from front to back, adding up the back block and the front tray.
Height of the front tray. 30–45 mm is comfortable for clips and notes; taller works for big objects.
Rounding of the corners seen from above. 10–15 mm gives a soft look; large values give a capsule shape.
Thickness of the outer walls. 2–2.4 mm is sturdy for a desk piece.
Thickness of the floor. 1.6–2 mm is enough; raise it if you want the part heavier so it doesn’t slide.
Back block
The tall back part: with cup, pencils and phone, or with compartments.
Height of the back block. It sets the height of the cup, the pencil holes and the phone’s backrest.
Depth of the back block (front to back). What’s left of the total depth goes to the tray.
«Cup, pencils and phone» builds the block with those three elements. «Compartments» divides it into tall cells, like a multi-cavity pencil holder.
Number and relative width of the back block’s compartments. «1,1,1» is three equal ones; «2,1» makes the first twice as wide.
How much lower than the rim the back block’s dividers are. 0 leaves them flush.
Width of the back block’s big cup (for scissors, rulers or markers). 0 removes it and leaves more room for pencils.
Number of individual holes for pencils or pens. 0 adds none.
Diameter of each pencil hole. 11–13 mm fits a regular pen; 15–18 mm, thick markers.
Adds a slanted slot in the back block to stand the phone up.
Length of the phone slot (left to right). With 70–80 mm the phone rests firmly sideways or upright.
Thickness of the phone with its case on, plus 1–2 mm of play. If it’s tight, the phone won’t go in or will scratch the case.
Backward tilt of the slot. 10–15° leaves the screen comfortable to read from the chair; 0° leaves it vertical.
Opens a channel behind the slot to pass the charger cable and use the phone while it charges.
Front zone
The low front tray, divided into columns and rows.
Number and relative width of the front tray’s columns. Drag the boundaries on the bar: «1,1.6,1» makes the middle one wider.
How many rows each tray column has. For example 1,1,2 leaves the third column split into two compartments (front and back).
Columns that get a notch at the front, to slip your fingers in and grab a note pad or cards. Tick the column numbers (from left to right).
How far the front notch drops from the rim. 15–25 mm is enough to grab a note pad.
Thickness of the front tray’s dividers. 1.2–1.8 mm is sturdy.
Rounding of the compartments’ inner corners. 3–5 mm makes it easier to get clips and coins out of the bottom.
Outer texture
Decorative relief on the outer walls. It doesn’t change the inside sizes.
Relief on the outer walls. The texture is added outward: the inside and the wall thickness don’t change, so inserts and usable sizes stay the same. «Ribs» and «Flutes» are vertical, «Rings» horizontal, «Waves» helical and «Knurl» a diamond pattern that gives grip.
How far the texture sticks out (mm). 0.6–1 mm shows well without overdoing it; more than 2 mm adds a lot of material and print time.
Spacing between ribs, flutes or waves measured around the part. Small values give fine striping; large ones, bold. It should be at least 3 times the relief.
Vertical spacing between rings, waves or knurl diamonds. With 0.2 mm layers, less than 2 mm looks stepped.