What it’s for
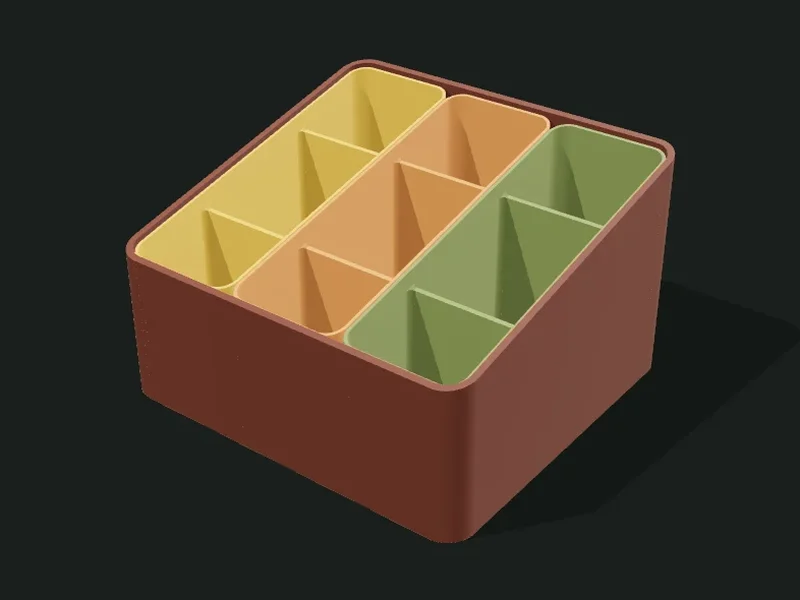
An organizer box with grid compartments and a slanted top rim (taller at the back than at the front), so you can see and grab what’s inside more easily. The compartments can be part of the box or removable inserts, so you can print the shell in one color and the inserts in another.
Ideas
- Desk organizer for pens, clips, notes and cables.
- Drawer tray for cutlery, screws or makeup (with equal heights front and back).
- Tool or spare parts box with compartments of different sizes.
- Gift piece or one to sell, in two colors and with text.
Step by step
- Choose a preset close to what you want (for example «Flat tray 4×3» for a drawer).
- In «Shell» enter the width and depth of the spot where it will go, and the back and front heights.
- In «Compartments» drag the column and row boundaries to give each cell the size you need.
- In «Inserts» decide whether the compartments are one piece with the box or separate inserts.
- If you want, add legs, an outer texture or text in the extras.
- Check «On the bed» that everything fits your printer and export.
Tips
- Measure the spot where you’ll put it and subtract 1–2 mm per side so it goes in without forcing.
- With separate inserts, clearance is key: if your printer is precise, 0.3 mm; if not, 0.5 mm.
- Dividers below the rim make it easier to slip your fingers in to take things out.
- For big boxes (over 200 mm), check that they fit your bed; if not, lower the width or split it into modules and join the modules with the extras.
Presets
Parameters
Case
Outer dimensions of the box and thicknesses. The top rim is a sloped plane between the back and front heights.
Outer width of the box, from left to right (X axis). It includes the walls; if you choose an outer texture, its relief sticks out a bit more.
Outer depth, from front to back (Y axis).
Height of the rim at the back. With more height at the back than at the front, the rim slopes toward you and it’s easier to see the contents.
Height of the rim at the front. Use the same value as the back for a straight-rimmed box (tray).
Rounding of the corners seen from above. 0 gives sharp corners; 8–15 mm gives a softer look and prints better (less pulling at the corners).
Thickness of the outer walls. 1.6–2.4 mm is sturdy; under 1.2 mm may be flexible on big boxes.
Thickness of the floor. 1.6–2 mm is enough; raise it if the box will carry weight or legs.
Compartments
How the inside is divided into columns and rows.
Number of columns (left to right) and the relative width of each one. Drag the boundaries on the bar: «1,1,1» is three equal columns and «1,2,1» makes the middle one twice as wide. Add or remove columns with the bar’s buttons.
Number of rows (front to back) and the relative depth of each one, same as the columns.
Thickness of the dividers between compartments. 1.2–1.6 mm is sturdy; thinner may be wobbly if the dividers are tall.
How much lower than the rim the dividers are. 0 leaves them flush with the rim; 5–10 mm makes the box look «clean» from outside and leaves room for your fingers.
Rounding of each compartment’s inner corners. With 3–5 mm it’s much easier to get small things (coins, screws) out of the bottom.
Inserts
Whether the compartments are part of the box or parts that lift out.
«Built-in» prints box and dividers in a single part (the fastest). «Single insert» makes one insert with all the compartments that goes into the shell. «One insert per column» or «per row» makes several inserts you can take out separately and rearrange, or print in different colors.
Play between the insert and the shell. With 0.3–0.4 mm the insert goes in and out without jamming; if it’s tight, raise it; if it wobbles, lower it.
Thickness of the inserts’ walls. Thinner leaves more usable space; 1.2 mm is a good balance.
How much lower than the shell’s rim the insert sits. A little (1–2 mm) keeps the insert from peeking out and looks neat.
Legs
Tapered legs that fit into holes in the floor.
Adds four tapered legs printed separately that fit with a peg into holes in the floor. They raise the box and give it a furniture look.
Height of the legs (how much they raise the box).
Diameter of the leg at the top, where it touches the box. It also sets the thickness of the peg that goes into the floor.
Diameter of the leg at the tip that rests on the table. Smaller than the top gives a tapered leg.
Outward tilt of the legs. 0° leaves them vertical; 10–15° gives them a Nordic furniture style and more stability.
Distance from each leg to the box’s corners. It must be greater than the leg radius plus the wall, otherwise the leg falls outside the floor (the app warns you).
Outer texture
Decorative relief on the outer walls. It doesn’t change the inside sizes.
Relief on the outer walls. The texture is added outward: the inside and the wall thickness don’t change, so inserts and usable sizes stay the same. «Ribs» and «Flutes» are vertical, «Rings» horizontal, «Waves» helical and «Knurl» a diamond pattern that gives grip.
How far the texture sticks out (mm). 0.6–1 mm shows well without overdoing it; more than 2 mm adds a lot of material and print time.
Spacing between ribs, flutes or waves measured around the part. Small values give fine striping; large ones, bold. It should be at least 3 times the relief.
Vertical spacing between rings, waves or knurl diamonds. With 0.2 mm layers, less than 2 mm looks stepped.