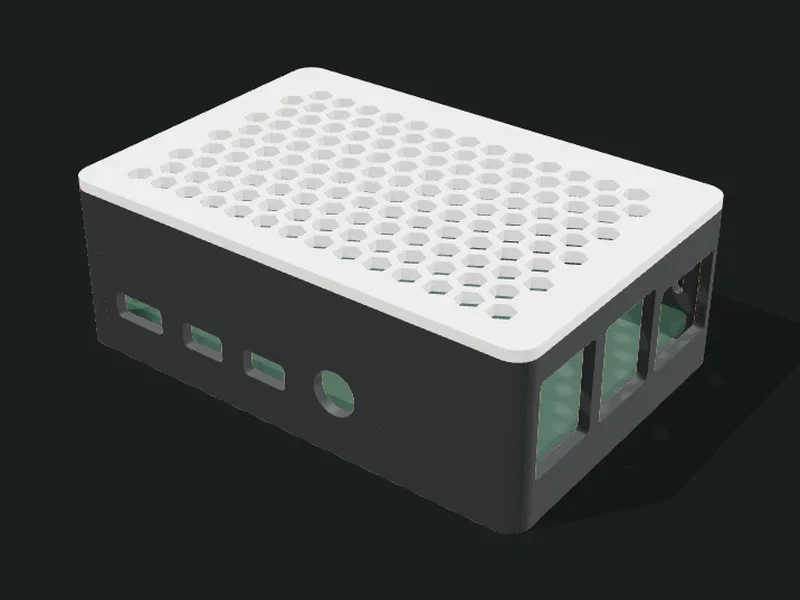
What it’s for
A custom enclosure for an electronics board: Raspberry Pi 4, Raspberry Pi Zero, Arduino Uno, ESP32 or your own board with manual sizes. The screw posts match the board’s holes, the ports are cut out automatically in place, and the lid can snap on or be screwed down, with a ventilation grille. It can also have slots on the sides, a cable hole and ears to hang it on the wall.
Ideas
- Case for a Raspberry Pi as a home server or media center.
- Case for an Arduino or ESP32 project (home automation, sensors, weather station).
- Wall box for a sensor or an irrigation controller.
- Case for your own board with manual sizes.
Step by step
- Choose a preset or directly the board in «Board». With «Manual sizes» enter length, width and holes.
- Set the height of the components (the tallest thing on top of the board) and the clearance under the board.
- Check in the viewer that the port cut-outs match your board.
- In «Box» adjust wall, floor, space around and how the board is screwed down.
- In «Lid» choose snap-on or screwed and the ventilation grille.
- Add extras (side slots, cable hole, ears) and export: box and lid come out separately.
Tips
- Measure your board first: some revisions have shifted ports. If a cut-out doesn’t match, raise the port clearance.
- Heat-set threaded inserts handle opening and closing many times; a screw straight into the plastic wears out.
- The Raspberry Pi 4 runs hot: give it a grille on the lid and slots on the sides.
- If the snap-on lid is loose, lower the lip clearance to 0.15 mm; if it doesn’t go in, raise it to 0.3 mm.
Presets
Parameters
Plate
Which board goes inside, how much space it takes and where the ports are cut out.
The board that goes inside. With the boards in the list, sizes, holes and ports are already loaded. «Manual sizes» lets you enter any board (without automatic port cut-outs).
Length of your board (the longest side), with manual sizes.
Width of your board (the shortest side), with manual sizes. Measure it with calipers.
Your board has mounting holes in the four corners: posts are generated to screw it down.
Distance from the center of each hole to the board’s edges. Measure it with calipers.
Diameter of your board’s holes. 3.2 mm is usual for M3 screws; 2.7 mm for M2.5.
The tallest thing sticking up from the board: connectors, heatsinks or pins. It sets the box’s inner height.
Height of the posts the board rests on. It leaves room for the solder joints and the pins underneath. 5 mm is almost always enough.
Automatically cuts the port openings (USB, HDMI, Ethernet, power) in the walls, in their real position.
Extra space around each port cut-out. 0.8 mm lets the connectors in with their plastic housing; raise it if one is tight.
Box
Thicknesses, free space and how the board is screwed down.
Thickness of the box’s walls. 2 mm is sturdy; under 1.6 mm it flexes when snapping the lid on.
Thickness of the box’s floor. 2 mm is enough.
Free space between the board and the inner walls. 1 mm lets the board in without forcing.
Rounding of the corners seen from above.
«Screw straight into the plastic»: the screw cuts its own thread in the post (simple, but it wears out if you open it often). «Heat-set threaded insert»: the post has room for a brass insert set with the soldering iron (firm and durable).
Lid
How the lid closes and whether it has a ventilation grille.
«Snap-on»: the lid has a lip with latches that goes into the box. «Screwed»: the box has ears and the lid is screwed down with M3.
Thickness of the lid. 2 mm is sturdy; thinner may warp with the grille.
Play between the lid’s lip and the box. 0.2 mm snaps in; raise it if it doesn’t close.
Ventilation grille on the lid: honeycomb, circles, slots or no grille.
Size of each grille opening. 3–4 mm ventilates well and keeps fingers out.
Extras
Side ventilation, cable pass-through and wall ears.
Adds ventilation slots on the walls without ports.
Adds a round hole in the back wall, at board height, to pass a cable (power, sensor).
Diameter of the cable hole. Add 1 mm to the real diameter so it goes through without forcing.
Adds ears with holes on the sides of the box to screw it to the wall.